Syinstruktionerna till mönstret för en kjol i tyg utan stretch:
- beskrivning av syinstruktionernas innehåll,
- exempel på var du kan lägga in dragkedjor,
- att klipper ut mönstret,
- att sy ihop kjolen och sätta in dragkedjor,
- att sy linning för kjol med en dragkedja,
- linning för en kjol med två dragkedjor.
Att sy i linning med en dragkedja i kjolen
KLIPP UT LINNINGEN
Kjolens linning klipps på samma sätt som till en kjol i stretch tyg. Istället för att ha linningens söm mitt bak, som i stretchkjolen, möts linningens ändar i det här mönstret på framstycket över dragkedjan. De överlappar också varandra för att ge plats till en knapp, hake eller kardborrband.
Linningens längd klipps efter midjans storlek + 8 cm (de 8 cm inkluderar 1 cm sömsmån i varje ände + 6 cm överlappning)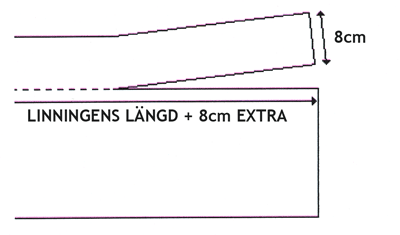 .
.
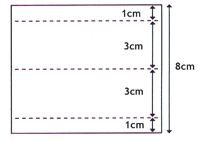 Och dess bredd klipps 8 cm (de 8 cm är för en 3 cm bred linning + 1 cm sömsmån).
Vik och pressa ändarna så här.
Om du har valt att använda stretch-tyg i bakstyckets mittpanel ska du sätta in en bit stretch i linningen också.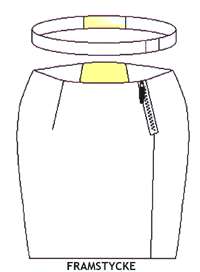

Den här linningen är klippt på samma sätt som de andra, förutom biten stretch som lagts in i den för att matcha stretchtyget i mittpanelen.
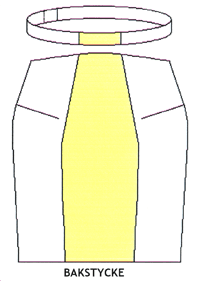

Mät noggrant var du ska sätta in stretch tyget så att linningen passar till både mittpanelen och har en tillräcklig överlappning vid dragkedjan.
Vik och pressa ändarna

ATT SY LINNINGEN
Fäst den ovikta sidan (B) av linningen mot kjolens top, tygets framsida ska vara vänt mot varandra. 
Kontrollera så överlappningen är placerad så ditt val av knapp, hake eller kardborrband kan sys på när linningen är på plats. 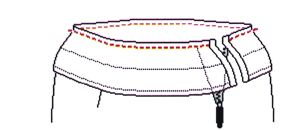
Var också noga med bakstyckets mittpanel om du valt att sätta in en bit elastiskt tyg.
Vik upp linningen och pressa sömmarna uppåt, mot linningen.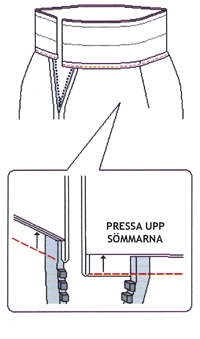
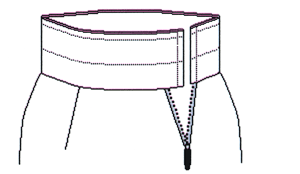
Vik ner linningen på kjolens insida. Sy ihop ändarna och sy längs nederkanten av linningen för att säkra den och göra sömmen slätare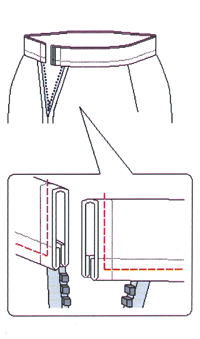 .
.




thanks for the illustration!!
Illustrations helped a LOT! Must be a lot of work. Thanks!
Your welcome
Just what I was looking for! I’m making a pencil skirt using one I own as a pattern. I know I’ve done this, but not doing it from a pattern this time I couldn’t remember the steps. Thanks for the great, easy to follow instructions, and illustrations.
Your welcome. We like pencil skirts 🙂
Thank you for taking the time to put this tuitorial together! I just finished my Christmas skirt and it really needs a waist band, thank you thank you thank you!
Thanks so much. You’ve done a great job. Please how do I sew pocket into a four pieces skirt.
Look at an ordinary skirt pattern and use the pockets in the side seams (you should be able to just fit them in the seam of our pattern. You can also use the adaption made for pockets in pants found here
http://en.fashionfreaks.se/patterns/mens-pants/sewing-instructions/adapting-pattern-sewing-pockets/
Pockets is a problem area as the usually pucker out when seated. If you want them anyway I personally would go for the ones in the link above av they are more attached to fixed seams.
Thank you so much for the tutorial. I have an unfinished skirt I made using one of my skirts but don’t know how to insert a waistband,this is of great help. Say,can you show how to make provision for zips and back vents when making patterns for a Straight skirt? Thank you once again for this tutorial.
Hi,
we don’t have an exact instruction for a skirt with zips and vent. At the moment we have received funding for other things so it’s hard to know when we will have time to get back to things like this. However, I am collecting a list of ”wishes” for later.
In the meantime you might find the instructions on this side http://en.fashionfreaks.se/patterns/skirts/sewing-instructions-non-stretch-skirt/insert-zips-and-sewing-together/ of use to you for the zips. This is applicable to hidden zips placed on any seam.
The vent is not something we have really approached. The closest you will find is the descriptions of slits in jackets on this page http://en.fashionfreaks.se/adapting-ready-made-clothes/simple-adaptions/jackets-slits-over-hips/ However, you will probably want to sew a slit/vent where the pieces overlap slightly as this will look a bit more fancy – especially for a vent in the back seam.
We’re not the only ones providing sewing instructions though, and when in doubt I always make a search on youtube where you can find a wealth of information. You might find one of these instruction videos helpful.
http://www.youtube.com/watch?v=66aq038eP5Y
or
http://www.youtube.com/watch?v=rLzya7hRUXY
Good luck
Susanne
On the last step, do you sew in the right side of the fabric or the wrong side, or can you do either? When we sew on the back side there are a few spots that miss the other side of the waist band…
Tack snälla för en utförlig och pedagogisk instruktion. Detta kommer hjälpa mig i mitt kollektionsarbete i skolan. TACK!