Syinstruktioner till byxor för män:
- beskrivning av syinstruktionernas innehåll,
- hur du anpassar mönstret och syr fickor,
- att klippa ut mönstret,
- att sy byxor med en enkel gylf,
- att sy byxor med en mer komplicerad, kort gylf,
- att sy byxor med extra lång gylf.
Hur du klipper ut mönstret
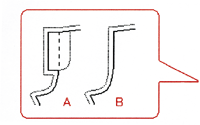
Framstycket till mäns byxor innehåller både mönster för byxor med enkel gylf och byxor med mer komplicerad gylf, liknande gylf som finns på jeans. Mönstret till byxor med enkel gylf klipps enligt bild A. Den mer komplicerade gylfen klipps enligt bild B.
Gylf enligt alternativ B är svårare att sy men med den finns också alternativet till en längre gylf för män som behöver extra lång öppning. Du behöver de extra mönsterdelarna till den mer komplicerade lösningen.
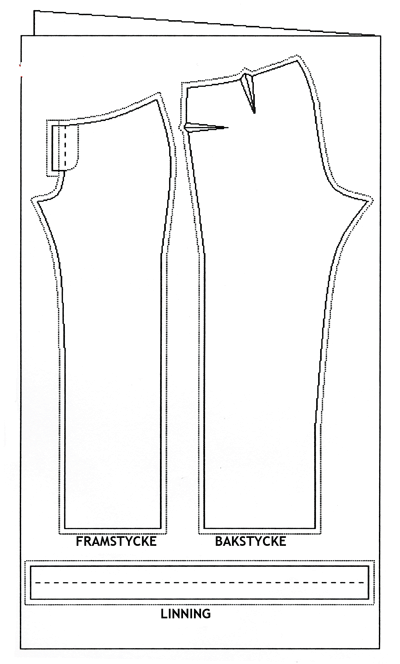
Klipp framstycke och bakstycke på ett dubbelvikt tyg så här.


Lägg till sömsmån (åtminstone 1cm) till alla kanter och 2,5-3 cm vid fållen. Kom ihåg att du kan mäta och anpassa längden på byxbenen för att passa din benlängd.
Beroende på din sittposition kan mönstrets benlängd vara mer eller mindre passande till dig. Om du vill vara säker, klipp därför byxorna något längre än du behöver dem. Det är lättare att korta av benen efteråt än det motsatta.
Linningen klipps i en bit om tygets bredd räcker till. Annars måste du klippa den i två delar och sy ihop mitt bak (kom ihåg att lägga till sömsmån också på de kanterna). Om du valt den mer komplicerade gylfen lägg ska du lägga till några extra cm (cirka 5 cm) till slutet av linningen.
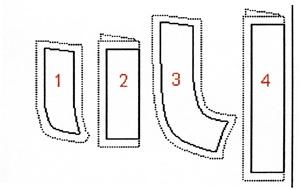
De extra mönsterdelarna för den komplicerade gylfen klipps x 1, d.v.s. på ett enkelt lager tyg. Till den korta, vanliga gylfen använder du delarna 1 och 2, till den längre gylfen använder du delar 3 och 4.

De här mönsterdelarna måste läggas ut på tygets rätsida när du ska klippa, annars kommer de inte att passa. Kom ihåg att lägga till sömsmån.


Does this apply for both male and female. Also, I am having a bit of a challenge in cutting a man’s bootcut. I will appreciate it if you can give me a general explanation on how to cut the fabric.
Yes, this is basically a general information that should help you understand how to position the pattern pieces on the fabric and add seam allowance.
I would suggest you alter the pattern first – to include the boot cut – and then cut the fabric. If you look at how the adapt pattern information for lengthening a skirt also includes widening it. http://en.fashionfreaks.se/patterns/read-before-use/easy-adaptations-of-patterns/
Apply this idea to your pant pattern. Basically add a small triangular shaped wedge – starting just above the knee and ending at end of the leg. Remember to widening the pattern on both sides of leg. If you have a pair of boot cut pants – which are not adapted for seated position but have pant legs which have the size and shape you want – I would take these measurements and use them adapting the pattern for the pant legs. Our adaptations – for the seated position – only alter the part of the pants from waist band to start of thighs.
If you don’t have a sample leg but are adapting the patterns by adding a wedge I would suggest you make a sample garment to make sure the legs are what you want. Making a sample garment sounds like a lot of extra work but it usually saves work in the long run.
http://en.fashionfreaks.se/patterns/read-before-use/making-a-sample-garment/
I would like to learn how to make cutting for a pant .
How to measure, How to cut for a pant.
I can sew and i used to make a pant, but it was not successful.
I know i need to learn more to get a perfect pant.
Can you share me more?
Thank in advance,
Beyond the information and patterns available we cannot provide anything. If there’s a specific part of our information you do not understand we can try to make it easier but you will have to point out which specific instruction this is.
I have developed a pants pattern for men over the last year or so. I was grueling but the thing I learned is that the front has to jut out some for the groin. The pattern above is imperfect, no offense, because the crotch seam doesn’t jut out at all. Also the crotch seam is too short. Also I don’t understand why the hips need to be accentuated like they are on a woman. The area below (under the crotch) is also not wide enough for any sort of flexibility. Also, guys hate short zippers. Even the back seems pretty flat to me. One thing to keep in mind is to let there be plenty of room in the but as well. Also if you decide to add an angle to the crotch make sure the space below (inner leg) compensates for the outer jutting of the groin.
Just thought yall might need a guys perspective.
The thing I said about the jutting of the crotch don’t listen to. Just Cut out a straight rectangle as wide one fourth of the hip measurement sitting down and gather it for your waist measurement. Use an angle of about 27 degrees going from the bottom of the zipper out to the edge of whatever measurement you want for inside seam. Take that down at a right angle and continue the pattern for the bottom of the pants. Taper the waistband seam so it is one or two inches higher in the back than the front. Don’t listen to the previous comment.
I want a complete details on how to make pattern of men and women pants (e.g. a complete diagram)
1. how to get the center measurement of the front
2. How many inches will be added in the inseam
3. How many inches will be added for the back waist etc.
If the information we provide is not satisfying for your needs you will have to approach someone else. There is only so much we have possibility to do within this project and on distance. If our patterns – which are available free – and the provided information on how to make added adaptations to these are not enough, I’m sorry but you will have to go elsewhere.
I love your webpage and it is well presented but it offers too little a detail on almost everything.It is like it is meant for only professionals and not for beginners or rookies!I would love you to give a more detailed step by step explanation on how to sew anything you put on this site.i.e.treat every information on how to sew as if you are talking to novices.Start with how many yards would be needed to sew a particular attire eg dresses,suits,trousers etc how to take measurements,the precautions needed and how to cut out and join patterns.Or otherwise I would appreciate if you can recommended any site where I can download complete information on anything I want to sew.Thanks for your understanding.
I don’t really think you have much to complain about. The information about how to calculate fabrics for example is available here http://en.fashionfreaks.se/patterns/read-before-use/how-much-fabric-do-you-need/ Every garment is explained exactly step by step.
I really think this is just a question of you not wanting to do your homework. But that is OK, it’s your choice. However, I can safely assure you that THIS website will continue providing information – for FREE – also in the future on exactly the level it is doing now.
If this is not to your liking you can chose to make your own website with information or pay someone else to do so.
Warm wishes /Susanne
Please how many inches of allowance should be given between the front piece and back piece while cutting men’s trouser.
Sorry for being missing in action . Now …
You can read about seam allowance needed for each pattern piece in the sewing instruction to the patterns – under the heading on how to cut out the pattern.
You guys are wonderful and your information is really helpful. Thanks a bunch. Hope to learn more here.