OBS! Anpassningarna under den här sidan är INTE individuella anpassningar av färdigsydda byxor. De är generella anpassningar för att passa en sittande position. Läs instruktionerna under ”VIKTIGT att läsa innan du anpassar byxor” innan du börjar.
Entrésida för anpassningar av byxor till sittande position
Varje byxanpassning blir egen beroende på vilken typ av byxor du anpassar. Generella mönsterdelar existerar inte eftersom varje mönsterdel måste utformas utifrån de byxor du tänker anpassa. Måtten är till för vägledning. Du kanske har tur och lyckas vid ditt första försök men du kan också behöva testa dig fram för att hitta den anpassningsutformning som passar din kropp. Du kan också behöva prova olika modeller och storlekar av byxor.
Alla våra byxanpassningar – oavsett om de gäller jeans eller vanliga byxor – är gjorda så enkelt som möjligt. En del anpassningar passar vissa personer och andra anpassningar gör det inte. Du behöver förmodligen pröva dig fram för att hitta den rätta kombinationen av jeans-/byxanpassningar för just dig.
Det är viktigt för oss att anpassningarna inte ska förändra originalbyxorna för mycket så vi har försökt hitta en balans med en bra anpassningar som gör plagget mer funktionellt men inte förändrar plaggets ursprungsdesign mer än nödvändigt.
Typer av byxanpassningar som tillhandahålls här
ANPASSNING AV BAKSTYCKET:
Syftet med den här anpassningen är att förlänga bakstycket på byxorna och förs det med en lätt böjd form. Detta görs inte bara för att byxorna ska sitta högre utan också för att förhindra framstyckets linning från att sitta väldigt trångt och skära in över mage och höfter.
GYLFANPASSNING:
Här visar vi hur du kan anpassa längden på gylfens dragkedja. Detta är en användbar anpassning som gör att byxorna är lättare att dra på och av eller dom görs av hygieniska skäl.
ERSÄTTNING AV KNAPP I LINNING:
Här visar vi hur du byter ut en knapp av jeanstyp mot en hyska och hake.
INPROVNING I KNÄVECKEN:
Inprovningen i knävecken görs för att ge byxan en lätt böjd form över knäpartiet vilket är användbart för att slippa en del av överflödet av tyg i knävecken.
ANPASSNING AV FICKORNA:
Fickanpassningen syftar till att sy ihop fickorna vilka ofta gapar öppet på ett fult sätt. De kan också var lätt oanvändbara för personer i sittande person. Anpassningen tar bort en del av överflödstyget och klumpiga veck som skapas av fickor runt ljumsken och låren.
OBS!
Dragkedjor i sidorna var ett försök till anpassning som inte blev lyckad på grund av kvaliteten i färdigsydda plagg. Om du behöver dragkedjor i sidorna rekommenderar vi att du syr byxor från vårt grundmönster. Information om var du kan placera dragkedjor finns under sidan om enkla anpassningar.
Klicka här för att gå direkt till information om var du kan sätta i dragkedjor.
Du kan naturligtvis pröva hur det fungerar för dig. Beroende av hur noggrann/duktig du är och byxornas kvalitet kan resultaten variera. För instruktioner om hur du syr i dragkedjor i sömmar se instruktioner om dragkedjor i kjol utan stretch. Att sätta i dragkedjor i sidsömmarna på byxor görs på samma sätt som det görs i sidsömmar till kjol.



I am trying to alter a regular pant pattern to fit an 18 year old college student with Spina Bifida. She has been wearing stretch pants but now would like to have a pair that is not stretch that she can wear to Church. The first sample pair I made was too blousy in the front so I tried to take out 1 1/2 inches oout of the front pieces in the side seams. Have not heard from the girl yet to see if that worked. If it is still too blousy that would probably indicate that there is too much fabric from waist to crotch. I was looking at your pants and see that the front is lower than the back. She wants elastic in the waist as that is what she is able to handle. Any suggestions? I am going to print off your pattern and make a sample for her. I really want to help this girl so if you have any suggestions I would love to have them.
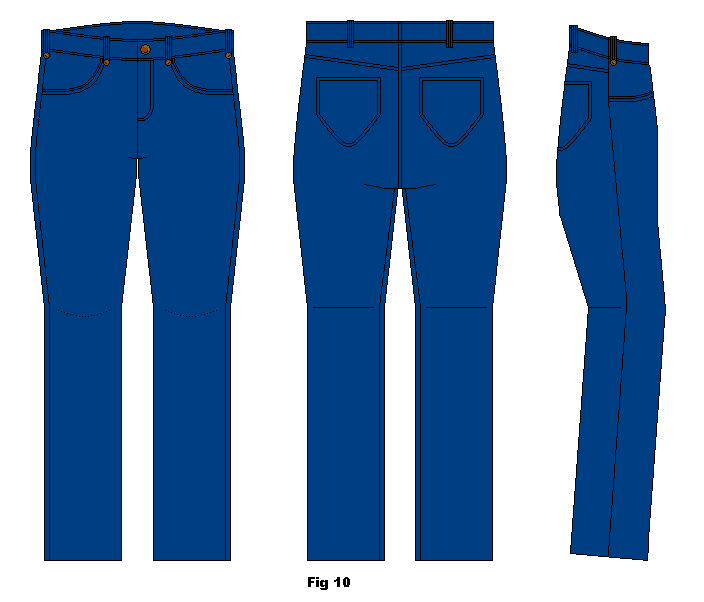
Our pants pattern is created at an angle (making them shaped to a seated position) which makes them, as you have figured out, lower in the front and higher in the back. The pattern might look very similar to ”normal” patterns but in reality there’s quite a bit of difference. We’ve tried alot of different ideas to fix both patterns and adaptions of ready-made garments (not just pants) and to get it right you have to create the adaptation from the ”middle” and not the ”sides” of pattern pieces/garment parts – in you case from the crotch seam. Every time we tried to fix things starting from the sides (and believe me we did it so many times) it ended up with fabric crinkling or blousing, legs twisting etc etc.
The images below are of a pair of adapted ready-made pants. You can see how much the adaption actually lengthens the back. If you have a ”normal” pattern you want to adapt I suggest you look at how we’ve shaped the adaptation piece for ready-made pants and try to use this shape to adapt your pattern. Remember – start from the middle back seam of the pants! Treat any tucks in the sides merely as consequences of the main adaptation.
Whether or not you try to make adaptations to ready-made pants or to ”normal” patterns or end up usig our adapted pattern, we would love to hear from you. We are planning to include a part on the site with examples, ideas, success stories and pitfalls that we have received from our internet network.
You reach us at fashionfreaks@independentliving.org
Edit: Meagan reminded me to say that we have the adpatation for ready-made pants with an elastic back like the image below.
Pants sewing easy and simple thanks to the beautiful work
can you please help ???I’m trying to make over a pair of pull on denim capris. It’s for a friend that is in nursing home….she is in wheelchair and they have asked that the backs of her pants be opened and put a velcro fastener on them. Can you please give me some suggestions ??/thanks Tammy
I alter clothing for a nursing home and find the best way to alter pants is to split at the back seam and zigzag the edges. Then add a strip of belting to the left side (about 6-8inches long)
sew a strip of velcro (soft piece) to the belting. Add the other strip of belting to the other side of the waist. I use about a five inch piece of velcro. This works very well.I also alter tops and nightgowns by splitting them down the back and making a placket as on a blouse and use strips of velcro to close. The staff find this works well for easier dressing and undressing. Hopefully you find this of use.